
Introduction
Modern web development calls for close interaction with backend APIs. Frontend development might be stalled while waiting for backend APIs to be ready. Mocking helps close that gap, although maintaining mocks by hand becomes difficult, especially as APIs evolve. This is where the power of the Mock Service Worker (MSW) and the OpenAPI Specification (OAS) comes into play. This post will show how to automatically create MSW handlers using an OpenAPI spec, generate mock data, and add realistic delays to the mock server.
This enables you to spin up accurate, realistic mocks with minimal manual effort and full alignment with your API contract, speeding up frontend development.
What is the OpenAPI Specification?

The OpenAPI Specification (OAS) is a machine-readable contract for your API. You define everything up front: endpoints, query params, request body, responses, and data shapes instead of relying on manual communication or trial-and-error. Not only is it useful for backend developers, but it also unlocks auto-generated mock servers, documentation (like swagger), auto-generated code and more. In short, OpenAPI provides consistency, clarity, and automation to the often messy world of API development and improves communication between frontend and backend teams.
In this article, we’ll use an existing RESTful API—swapi.tech—to explore what MSW, OpenAPI, and AI can do together.
What is MSW?
Mock Service Worker (MSW) lets you intercept network requests directly in the browser or Node.js, without modifying your application code. It runs in the background (using a service worker) and responds with mock data, enabling you to build, test, and debug applications even when the backend API is unavailable or not present at all.
You can combine MSW with data generators like faker.js or rosiejs. In this post, we’ll use faker.js, as it’s the more up-to-date and actively maintained library.
Note: Before diving into setup, remember this key point from the MSW docs:
„It’s important to approach those handlers from the server’s perspective since, effectively, you are describing how the server should behave in a particular scenario.“
Even though the logic lives in your frontend codebase, think of MSW handlers as mimicking your backend logic, not extending your frontend.
🛠️ Setup
We are building a Star Wars app using data from swapi.tech, but:
- The API has rate limits or downtime
- You want to work offline
- You need to test edge cases or non-existent values
Instead of recreating backend controllers, you can mock the API using MSW, generate realistic data with faker.js, and describe endpoints using an OpenAPI spec.
1. ✅ Define the OpenAPI Spec
We’ll use OpenAPI 3.1.1. First, create a folder and YAML file for your spec:
mkdir docs && touch swapi-openapi-spec.yaml
openapi: "3.1.1"
info:
  title: "swapi.tech – Star Wars API"
  version: "1.0.0"
  description: "Public read-only Star Wars data as described on swapi.tech"
servers:
  - url: https://www.swapi.tech/api
We’ll later extend this with paths and schemas. swapi.tech is simple enough to map quickly. For more complex APIs, more time is needed to fully understand relationships between resources.
🔗 Resource Endpoints
- GET /people
- GET /people/{id}
- GET /planets
- GET /planets/{id}
- GET /starships
- GET /starships/{id}
- GET /films
- GET /films/{id}
- GET /species
- GET /species/{id}
- GET /vehicles
- GET /vehicles/{id}
👨🚀 Entities
- People
- Planets
- Films
- Species
- Starships
- Vehicles
We then add schemas and query parameters like this:
paths:
  /people:
    get:
      summary: List all people
      parameters:
        - name: page
          in: query
          required: false
          schema:
            type: integer
            default: 1
        - name: limit
          in: query
          required: false
          schema:
            type: integer
            default: 10
            maximum: 100
      responses:
        "200":
          description: "List of people"
          content:
            application/json:
              schema:
                $ref: "#/components/schemas/PeopleListResponse"
components:
  schemas:
    BaseApiResponse:
      type: object
      properties:
        message:
          type: string
          example: "ok"
        apiVersion:
          type: string
          example: "1.0"
        timestamp:
          type: string
          format: date-time
        support:
          type: object
          properties:
            contact:
              type: string
              example: "admin@swapi.tech"
            donate:
              type: string
              example: "https://www.paypal.com/donate/..."
            partnerDiscounts:
              type: object
        social:
          type: object
          properties:
            discord:
              type: string
            reddit:
              type: string
            github:
              type: string
    PeopleListResponse:
      allOf:
        - $ref: "#/components/schemas/BaseApiResponse"
        - type: object
          properties:
            total_records:
              type: integer
            total_pages:
              type: integer
            previous:
              type: [string, "null"]
            next:
              type: [string, "null"]
            results:
              type: array
              items:
                $ref: "#/components/schemas/ListItem"
    ListItem:
      type: object
      properties:
        uid:
          type: string
        name:
          type: string
        url:
          type: string
In the above code snippet, we defined two main properties for the specification. Paths including endpoint identifiers and the actual method type (GET verb), query parameters that the endpoint can accept, and a success response (status „200“).
Another significant attribute is components which allows you to design the spec’s entities in a reusable manner and improves the spec’s readability.
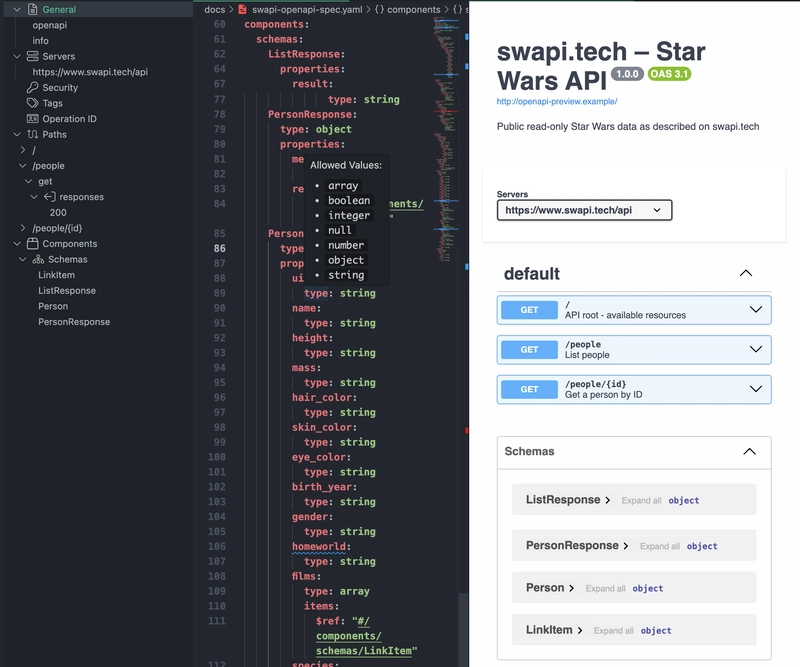
💡 Tip: Use 42Crunch VS Code extension to preview your OpenAPI spec as Swagger UI.
Generating Models and Mocking
⚖️ Setup MSW
🤖 AI-Powered Models (or not)
The OpenAPI standard’s strength lies in its interoperability across various tools. So if you do not care about your models‘ privacy or OpenAPI spec privacy, you can share your OpenAPI with an AI model (ChatGPT, Claude, GitHub CoPilot, Cursor, etc.) and request it to export all models and query params from the OpenAPI spec to typescript.
Nevertheless, for enterprise-grade or schema-rich APIs, general-purpose language models are prone to hallucinations and structural inconsistencies. So instead of using a generic AI model, you can utilize deterministic generators like openapi-typescript or similar libraries that will generate the TypeScript models out of a given OpenAPI spec. Some of the benefits of using such a library are
- Local-first model generation with no data leakage
- Predictable and verifiable outputs
- Open-source flexibility for introspection, extension (via forking), and community contribution
🤖 AI-Powered Mocks (or not)
Install msw-auto-mock:
npm install msw-auto-mock --save-dev
Configure your AI model in package.json:
"msw-auto-mock": {
  "ai": {
    "model": "gpt-4o",
    "enable": true,
    "provider": "openai",
    "openai": {
      "apiKey": "process.env.OPENAI_API_KEY"
    }
  }
}
Run the generator:
npx msw-auto-mock ./docs/mock-swapi-openapi.json -o ./mock

💡 Tip: Alternatively if you don’t want to use the ai feature, you can simply by pass the configuration of
msw-auto-mockin the package.json and library will generate dynamic mocks primarily based on fakerjs._
🔄 Conditionally Enable Mocking
// index.js
export async function enableMocking() {
  if (process.env.NODE_ENV !== 'development') return;
  const { worker } = await import('./browser');
  return worker.start();
}

// main.tsx
import { enableMocking } from './mock';

enableMocking().then(() => {
  console.log('Mocking enabled');
  createRoot(document.getElementById('root')!).render(
    <StrictMode>
      <App />
    </StrictMode>
  );
});
🏢 Exclude MSW From Production Builds
Something important to consider is that we do not need the MSW for production builds; therefore, we can opt out of all MSW modules from our final bundle file. In Vite configuration, this can be done by creating a custom rollup function called manualChunks that will parse all chunk IDs, which parses all chunk IDs (where each ID is the file path). If the chunk belongs to MSW, we mark it as an external package and exclude it from the final bundled file. Finally, we add an esbuild utility to treeshake any remaining MSW initialization code for the production build.
export default defineConfig(({ command }) => {
  const isProductionBuild = process.env.NODE_ENV === "production" && command === "build";
  return {
    plugins: [react(), tsconfigPaths()],
    build: {
      target: "esnext",
      rollupOptions: {
        external: ["@faker-js/faker"],
        output: {
          ...markMSWmodulesAsExternal(isProductionBuild),
        }
      }
    },
    esbuild: {
      pure: treeShakeMSWModules(isProductionBuild)
    }
  };
});

function markMSWmodulesAsExternal(isProductionBuild = false) {
  return isProductionBuild ? {
    manualChunks(id) {
      if (id.includes("msw") || id.includes("/src/mock/")) return "msw";
    }
  } : {};
}

function treeShakeMSWModules(isProductionBuild = false) {
  return isProductionBuild ? ["startMockServiceWorker", "setupWorker", "setupServer"] : [];
}
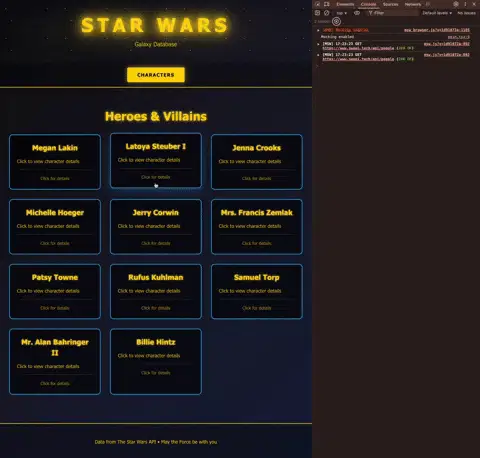
🎨 Time to Build!
Start your app, open localhost, and start building your UI with no backend required — vibe code your Star Wars app 🤖.
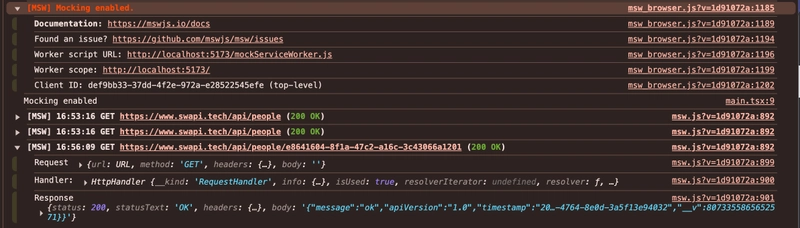
MSW logs requests in the browser console:
⏳ Add Delay for Realism
// handlers.js
export const handlers = [
  http.all('/*', async () => {
    await delay(2000);
  }),
  ...
];
After adding delays, your app will naturally reflect real-world latency, which is perfect for testing loading states.

💡 Tip: To protect your frontend application from changes in backend models, use transformation methods that convert server responses to client models—and vice versa. This way, when backend data structures change, you typically only need to update your transform layer.
Example:
Initial data integration using a transform method:
type ResponseData = {
  first_name: string;
  last_name: string;
};

const transformer = (data: ResponseData) => ({
  firstName: data.first_name,
  lastName: data.last_name,
});
Later, if the backend response changes:
type ResponseData = {
  person_details: {
    first_name: string;
    last_name: string;
  };
};

// Only the transformer needs to be updated
const transformer = (data: ResponseData) => ({
  firstName: data.person_details.first_name,
  lastName: data.person_details.last_name,
});
The repository link is in the first comment ⬇️!
Thanks for reading, and may the mocks be with you! 🌟