
How to Integrate ChatGPT’s API With Python Projects
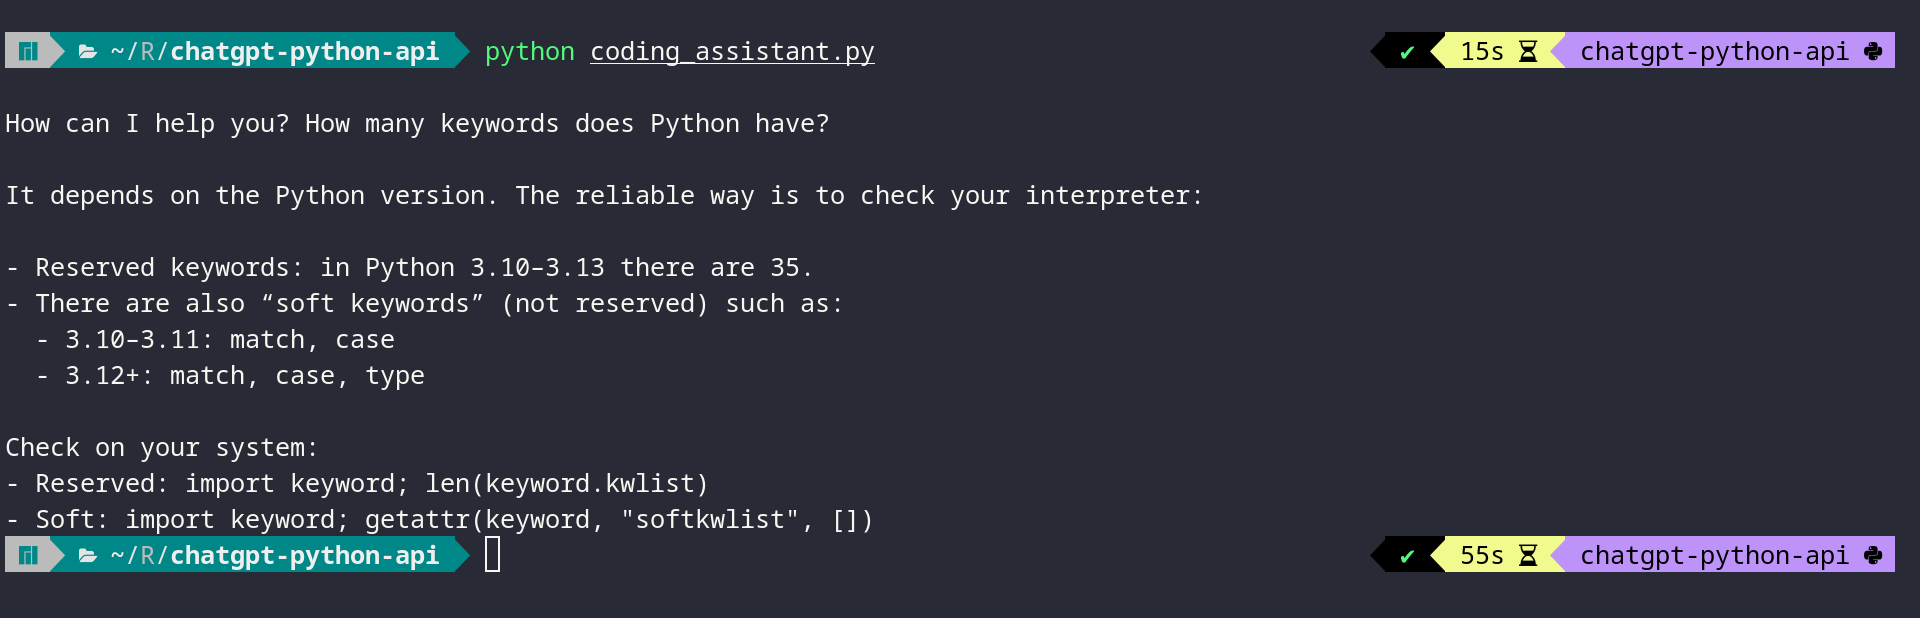
Python’s openai library provides the tools you need to integrate the ChatGPT API into your Python applications. With it, you can send text prompts to the API and receive AI-generated responses. You can also guide the AI’s behavior with developer role messages and handle both simple text generation and more complex code creation tasks. Here’s an example:
After reading this tutorial, you’ll understand how examples like this work under the hood. You’ll learn the fundamentals of using the ChatGPT API from Python and have code examples you can adapt for your own projects.
Get Your Code: Click here to download the free sample code that you’ll use to integrate ChatGPT’s API with Python projects.
Take the Quiz: Test your knowledge with our interactive “How to Integrate ChatGPT’s API With Python Projects” quiz. You’ll receive a score upon completion to help you track your learning progress:
Interactive Quiz
How to Integrate ChatGPT’s API With Python Projects
Test your knowledge of the ChatGPT API in Python. Practice sending prompts with openai and handling text and code responses in this quick quiz.
Prerequisites
To follow along with this tutorial, you’ll need the following:
- Python Knowledge: You should be familiar with Python concepts like functions, executing Python scripts, and Python virtual environments.
- Python Installation: You’ll need Python installed on your system. If you haven’t already, install Python on your machine.
- OpenAI Account: An OpenAI account with API access and available credits is required to use the ChatGPT API. You’ll obtain your API key from the OpenAI platform in Step 1.
Don’t worry if you’re new to working with APIs. This tutorial will guide you through everything you need to know to get started with the ChatGPT API and implement AI features in your applications.
Step 1: Obtain Your API Key and Install the OpenAI Package
Before you can start making calls to the ChatGPT Python API, you need to obtain an API key and install the OpenAI Python library. You’ll start by getting your API key from the OpenAI platform, then install the required package and verify that everything works.
Obtain Your API Key
You can obtain an API key from the OpenAI platform by following these steps:
- Navigate to platform.openai.com and sign in to your account or create a new one if you don’t have an account yet.
- Click on the settings icon in the top-right corner and select API keys from the left-hand menu.
- Click the Create new secret key button to generate a new API key.
- In the dialog that appears, give your key a descriptive name like “Python Tutorial Key” to help you identify it later.
- For the Project field, select your preferred project.
- Under Permissions, select All to give your key full access to the API for development purposes.
- Click Create secret key to generate your API key.
- Copy the generated key immediately, as you won’t be able to see it again after closing the dialog.
Now that you have your API key, you need to store it securely.
Warning: Never hard-code your API key directly in your Python scripts or commit it to version control. Always use environment variables or secure key management services to keep your credentials safe.
The OpenAI Python library automatically looks for an environment variable named OPENAI_API_KEY when creating a client connection. By setting this variable in your terminal session, you’ll authenticate your API requests without exposing your key in your code.
Set the OPENAI_API_KEY environment variable in your terminal session:
Replace your-api-key-here with the actual API key you copied from the OpenAI platform.
Install the OpenAI Package
With your API key configured, you can now install the OpenAI Python library. The openai package is available on the Python Package Index (PyPI), and you can install it with pip.
Open a terminal or command prompt, create a new virtual environment, and then install the library:
Read the full article at https://realpython.com/chatgpt-api-python/ »
[ Improve Your Python With 🐍 Python Tricks 💌 – Get a short & sweet Python Trick delivered to your inbox every couple of days. >> Click here to learn more and see examples ]